
by LCDR Andy Hopkins
The single most important item in a Third Reich badge* collectorÆs ōbag of tricksö is a working knowledge of period construction and finishing techniques. Most modern reproductions, even the very good ones, fail to capture the subtle nuances of an original piece. With this article, I hope to take some of the mystery out of this subject and arm the beginning collector with enough basic knowledge to serve as a starting point.
Materials
The materials used in the manufacture of original Third Reich badges can be broken down into three categories: High quality, medium quality and low quality**.
- High quality materials include aluminum (used almost exclusively on some early Luftwaffe qualification badges), brass, bronze, tombak (a copper and zinc alloy which looks like bronze),ōGermanö silver (a nickel alloy which does not actually contain silver) and occasionally precious metals such as genuine silver and gold. The look of aluminum, bronze, and consequently tombak should be familiar to most readers. With regard to German silver, collectors should be aware that there are two forms, neusilber (new silver) and altsilber (old silver). Neusilber has a bright, shiny appearance while altsilber has a dark appearance created by an artificial oxidation process. When in mint condition, neusilber has the appearance of genuine silver, but will not develop a dark tarnish. Instead, neusilber forms a distinctive gray, or gray/brown patina.
Genuine silver was rarely used in the manufacture of Third Reich badges. When original items constructed of genuine silver are encountered, they will normally be marked as such. The most commonly encountered silver content mark is ō800ö, which means the item in question is 800 parts genuine silver and 200 parts alloying agents (often nickel). Higher silver content numbers may be encountered on items of exceptional quality, but any piece marked 925 (sterling silver) should be treated with suspicion owing to the fact that an English repro maker typically marks his pieces with this content number. Because of its softness, pure silver was considered impractical for the construction of military badges. Real gold will probably never be encountered by the average collector, as its use was reserved exclusively for exceptionally high quality or prestigious awards. As a general rule of thumb, Third Reich badges constructed of high quality materials have the look and feel of heavy, well made costume jewelry.
- Medium quality materials include various white metal and refined zinc alloys. These materials are generally lighter and cheaper feeling than their high quality counterparts. None the less, medium quality materials responded well to the manufacturing techniques discussed later in this article and rendered a detailed, attractive badge. Unlike pieces made with high quality materials, however, medium quality materials were not designed to stand the test of time. Badges in this category can often be found with a dark discoloration and lifted or bubbled plating.
- Low quality materials consist primarily of rough, dark zinc based alloys
commonly referred to by collectors as ōKriegsmetallö (war metal) or monkey
metal. While this material also responded well to the various tool and die
techniques, it was unsuited to the plating process. As a result, these pieces
were finished with lacquer washes and paints. This process will be discussed in
the section on finishes, but it should be noted that lacquer finishes
deteriorated rapidly as a result of wear and the acid content of the underlying
kriegsmetall. As a result, badges made of low quality materials are often
encountered without a finish of any kind, the exposed kriegsmetall having a
rough, gray appearance. At this point it is probably worth pointing out that,
although many of the zinc alloys used in badge construction contained lead, no
genuine Third Reich badge was ever constructed solely from lead.
Consequently, an original badge will never bend under finger pressure!
Construction
The techniques used to create original Third Reich badge components can be broken down into three categories: Die stamping, die forging and die casting.
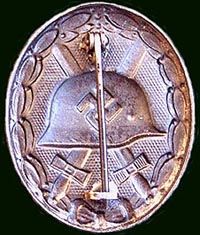
- Die stamping is a process in which a thin sheet of cold metal is impressed with an image by means of a heavy industrial die. Die stamped pieces are characterized by being thin and relatively flat. Also, on a die stamped piece, the entire image will normally be visible on the obverse (front) and reverse. Like all original badges, die stamped pieces have crisp, consistent detail. The common Black Wound badge and the various arm shields are examples of die stamped pieces. Brass, steel and zinc alloy sheet metals were the most commonly used materials in the die stamping process. The Black Wound Badge pictured below is an example of die stamping. Note the use of thin sheet medal and the mirror image effect on the reverse. The badge is unmarked, and has lost most of it's finish.
|
Black Wound Badge 1939 | |
|---|---|
 |
|
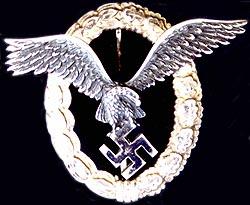
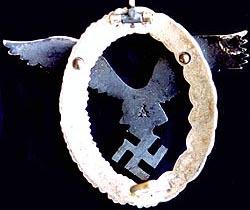
- Die forging is a process by which a thicker piece of metal is heated to the point of malleability, and then stamped with a heavy die. This process was used for heavier badges, or ones with a more three dimensional design. Die forging was preferred for these types of badges because the hot, soft metal was easier to form into complex patterns and caused less wear to the dies. The classic indicator of a die forged piece is the presence of die sheer marks on the edge of the badge. These marks take the form of fine, parallel lines running perpendicular to the flat surface of the badge. Sometimes sheer marks will show up as distinct ridges, but often they appear as nothing more than subtle differences in color. Sometimes visible to the naked eye, sheer marks become obvious under magnification. When examining a badge for sheer marks, one must keep in mind that most badges were hand finished after coming out of the die. As a result, it is not uncommon for die sheer marks to have been at least partially obliterated around the outside edge of the badge. They should always be present, however, on the inside, more difficult to reach edges of the image. Sheer marks are also associated with die stamped pieces, but are often difficult to spot owing to the thin profile of the raw material used in the stamping process. A second indicator of die forged pieces is commonly called ōcold shuntingö. This phenomenon manifests itself as tiny fissures or imperfections in the surface of the badge and is caused by uneven cooling after the forging procedure. Once again, these telltale marks become obvious under magnification. Cold shunts should not, however, be confused with the bubbling associated with hand cast reproductions. Die forging leaves a crisp, consistent and exceptionally detailed image. With their complex design and three dimensional appearance, high quality Luftwaffe pilot qualification badges, like the one pictured below, are good examples of die forging.
|
Luftwaffe Pilot Qualification Badge | |
|---|---|
 |
|
- Die casting involves the injection of pressurized molten metal into a closed die. Once the contents of the die have cooled, the product is ejected from the die and hand finished into itÆs final form. Again, die casting results in fine, consistent detail and a smooth flat reverse. To me, die cast pieces have a slightly smoother, more mass produced look to them. Often die cast pieces have the hinge and catch molded in as an integral part of the badge. Ejector marks, which take the form circular marks on the reverse of the badge, are also commonly found on die cast pieces and are caused by the ejector pins which pop the cooled badge out of the die. As a point of reference, many modern toy cars and trucks (ōHotwheelsö etc) are die cast and exhibit the same ejector marks as original German badges. A good example of a die cast badge with an integral hinge and catch is the one piece Luftwaffe Ground Combat war badge. The General Assault war badge is also commonly found in die cast form. Because it was more compatible with cheap raw materials and minimal hand finishing requirements, it is my opinion that die casting was used primarily as a cost saving measure.
- Although not a technique used in the construction of original badges, a description of hand casting may prove useful to the collector owing to the fact that most reproduction badges are made by this method. Hand casting involves the use of a pattern (often an original badge) which is impressed into a waxy substance in order to make a mold. Once the mold has been created, molten metal is hand poured into the image and allowed to cool. The badge is then removed from the mold and finished. Hand casting normally results in a final product that is slightly smaller than the original and that has muddy, inconsistent detail. Also, the reverse of a hand cast badge will often appear wavy and uneven. Since the molten metal is poured by hand and not injected under pressure, small air bubbles are often visible on hand cast pieces. Finally, hand casting does not replicate the crisp edges and sheer marks found on original badges, the edges of a hand cast piece being smooth and rounded. A newer, more sophisticated reproduction technique is now available which uses fine grain dental resin to form a closed mold. These pieces have very good detail and flat, smooth reverses, but once again lack die sheer marks.
- Once the components of an original badge were die stamped, forged or cast,
they were hand finished to remove rough edges and, in the case of multi piece
badges, assembled into the final image. Well formed, domed rivets are the most
commonly encountered method of assembly, but solder was used on certain badges.
For example, the eagle and swastika on most Luftwaffe Flak badges are soldered
into place. Hollow, exploded rivets were also used by certain makers, most
notably Gebruder Wegerhoff, Ludenscheid (GWL). If hollow rivets are encountered,
they should be neatly executed and finished.
Pins, Hinges and Catches
A myriad of materials and techniques were used to create the pins, hinges and catches of original Third Reich badges. The common characteristic that ALL original fastening devices have, however, is durability and strength. Flimsy brooch pins, or pins made from soft bendable metals were never affixed to original badges.
- Original pins may be encountered in a flat wide shape which expands slightly toward the middle, then tapers to a point at the end. These ōfat belliedö pins were sturdy, die stamped affairs and should exhibit the same sheer marks found on the badge itself. There are also original pins made from heavy, round stock. The ends of these round pins were normally neatly finished so as not to snag on the wearers uniform. One often hears that original pins should be magnetic, but there is no consistency to this argument. Some originals are magnetic, while other, equally original pins are not.
- Original hinges also appear in several forms, including barrel hinges, hinges formed from flat metal sheet and those which have the appearance of having been milled from a small block of metal. This latter type is common on higher quality Kriegsmarine and Heer badges.
- Original catches were normally created by forming a small piece of stout, round metal stock into a ōCö shape and then attaching it to the badge. Flat metal stock was also used occasionally. Like an original pin, the exposed end of the catch will normally be well finished.
- The method by which original pin assemblies were fastened to the badge
varies with the quality of the raw materials used to form the basic image. On
badges made from high quality materials, hinges and catches are normally neatly
soldered directly to the badge. On badges formed from cheaper materials, hinges
and catches are often attached to small plates, which are then soldered to the
badge. Some cheaper badges also have their hinges and catches staked into place
by small flanges of metal. This process was used as a labor saving measure, and
is often found on pieces such as the Army/Waffen SS Close Combat Clasp and
Infantry Assault badge.
Finishes
Like the materials used to form the metallic components of original badges, the materials and methods used in the finishing process vary in quality. Once again broken down into three categories, the finishing techniques listed below correspond directly to the type of metal used to make the badge.
- Badges made from high quality metals will invariably have a heavy, high quality finish. If the badge required a final color which corresponded to that of the base metal, the image was often removed from the die, cleaned and then simply burnished or frosted to produce the final product. If silver plating was required, various high quality nickel alloys were normally used. In the case of gold finishes, a process called fire gilding was commonly employed. This technique uses mercury and is extremely dangerous to the person executing it. In fact, fire gilding is no longer used for just this reason. An original fire gilded finish has a powdery, almost translucent glow, and is quite striking and beautiful. Many modern copies use a harsh, metallic-looking ō24 karatö gold finish which fails completely to capture the look of original fire gilding. High quality Kriegmarine badges and gold Luftwaffe clasps are normally encountered with fire gilded finishes.
- Badges made of medium quality materials often have thin, cheap plating which tends to bubble and discolor with age.
- Badges made from poor quality materials are typically found with finishes made from a substance known as ōBrennlaqö. Essentially a lacquer paint, this substance was applied to the badge in the appropriate color, and then heat treated. The result was an acceptable product, but one which almost immediately began to deteriorate. It is not unusual to find badges made from poor quality materials with little or no Brennlaq remaining.
- Although more readily associated with medals and awards, a discussion of
enamel finishes is included for the general benefit of the reader. Genuine
enameling is accomplished through the use of colored glass powders which are
inserted into the appropriate place on a metal image, then fired to the
consistency of glass. This process is repeated until all of the necessary colors
have been applied and the desired thickness has been achieved. The piece is then
ground and polished to produce a smooth, consistent finish. Original enameling
has a distinctive translucent depth. If observed under magnification, original
enamel will show marks from the polishing process and tiny, tiny imperfections
which look like bubbles. Additionally, light colored original enamel, most
notably white, will often contain tiny flecks of darker color. This effect is
the result of imperfections in the glass powder and is caused by the firing
process. Finally, chipped original enamel will often exhibit concentric circles
like those caused when a BB is fired at a glass window. Most modern ōenamelö is
actually a form of plastic and fails to capture the look and feel of the
original. Period enamel work, even on common items such as the MotherÆs Cross
and NSDAP member badge, is always of the highest quality. As such, it is an
extremely difficult and time consuming finish to accurately reproduce.
Cases
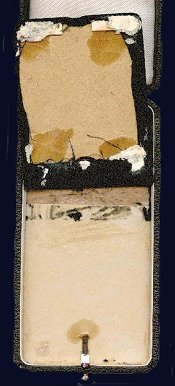
An original case can greatly enhance the visual appeal, historical interest and monetary value of a Third Reich badge. Unfortunately for the collector, cases are reproduced as frequently and accurately as the badges themselves. Many of these cases are made to original specifications by the firms which produced them during the Third Reich. How, then, does one sort out the good from the bad? As with badges, a discussion of original manufacturing techniques and materials may prove helpful. Original cases seem to have been made from a thick, formed paper material. These paper shells were then covered either with a tightly woven, colored cloth material (common on war badge cases) or a textured black paper product known as ōleatheretteö by collectors. The inside of the top half was typically fitted with a piece of cotton batting, over which was applied a satin or rayon panel in the appropriate color. The bottom of the case was normally fitted with a pressed cardboard insert which included a cutout for the badge pin assembly. This insert was in turn covered with a colored flocking material and edged with a thick white strip of card stock. Higher quality cases were constructed with tiny piano hinges, while cheaper variants were hinged with paper. Some cases used press stud catches of various designs, while others relied on spring tension or friction to hold them shut. The various inner components of original cases were held together by a thick glue.
Some points to consider when determining the originality of a case:
- Spongy foam batting was NEVER used on original cases, but is common on repros and on cases made to fit 1957 reissue awards.
- The glue used to construct original cases has a distinct look. It is normally yellow or brown and is almost always quite brittle and cracked, often looking like a mud flat on a very hot day. The best place to observe glue remnants is under the pressed cardboard insert. Obviously, this is problematic on cases which have this piece still firmly attached. On many original cases however, the cardboard insert will be loose as a result of the glue cracking, or an overzealous collector breaking the seal in an attempt to determine originality. Modern epoxy based glues normally dry clear and will not crack and craze like original glue. While on the subject of a caseÆs innards, it should also be pointed out that if one encounters quality control or inspector marks they should be in pencil vice ballpoint pen!
- Laugh if you will, but original cases always seem to have a distinctive smell! This odor is quite pungent and is something akin to a stack of old papers or books. Obviously cases which have a new or freshly glued smell should be avoided. DonÆt blame me, though, if you are asked to leave your next militaria show after having been caught sniffing badge cases!
The information I have provided above is certainly not all a collector needs
to know in order to avoid being taken advantage of, nor is it necessarily the
final word. The great thing about this hobby is that it is a learning process.
Half of the fun is in the quest for knowledge. For this reason, I welcome any comments, positive
or otherwise, regarding this article. Remember, this is just a hobbyģ if youÆre
not having fun, youÆre missing the point! Good collecting.
* This article deals specifically with Third Reich badges, but many of the comments pertain equally to medals and awards.
** I have chosen to avoid the common practice of equating quality directly to
a specific time period, i.e. early war, mid war etc. I have always found this
practice to be confusing and perhaps a bit misleading. While it is certainly
true that GermanyÆs badge industry turned more and more to the use of cheaper
non-strategic materials as the war progressed, I think it is also at least
feasible that badges constructed of cheaper materials were produced alongside
those of a higher quality, either as a less expensive alternative for the
private purchase market, or by firms unable to afford the cost of high quality
materials. I feel that there is still a lot to learn about this subject,
especially the nature of badge production in the less regulated early war
period.
Bibliography
Angolia, John R. For Fuhrer and Fatherland: Military Awards of the Third Reich. San Jose Ca, R. James Bender Publications, 1976.
Angolia, John R. For Fuhrer and Fatherland: Political and Civil Awards of the Third Reich. San Jose Ca., R. James Bender Publications, 1978.
Biggers, Andrew. The Historic Iron Cross 1813-1957. Website.
Forman, Adrian. FormanÆs Guide to Third Reich German Awardsģand their Values. San Jose, Ca., R. James Bender Publications, 1993.
Hamelman, William F. German Wound Badges 1914-1957. Dallas, Tx., Matthaeus Publications.
Tucker, Michael F. Collecting Military Badges of the Third Reich. Boca Raton,
Fla., MilSpec Publications, 1997.
![]()
® Copyright Wehrmacht-Awards.com LLC |